When engineers think about code scanning, the first few things that come to mind are:
- Unit tests
- Mock tests
- Integration tests
- Smoke tests
- but all from an application perspective
Although it’s of course crucial to scan your entire code base, there’s another code base that many forget about - configuration code.
In this blog post, you’re going to learn why you would want to scan Kubernetes Manifests and how to do it with Kubescape.
For the purposes of this blog post, the Kubescape cloud will be used. The Kubescape CLI is a great option, but the UI definitely gives a more robust feel and makes your life easier from a visual perspective. If you’d like to sign up for it, you can do so here.
Prerequisites
If you’re following along with the hands-on portion of this blog post, you will need:
- The Kubescape CLI, which you can find here.
- A GitHub account, or another Git-based repo system.
Why Conduct Repo Scanning
Any code that’s written can have a vulnerability and misconfiguration, whether it’s application code, a 20 line Python script, or even YAML. Outside of code itself, scanning an actual environment/servers and container images should be thought about in the same way.
When engineers think about vulnerabilities, security threats typically come to mind. However, that's not the only type of vulnerability. There are also best practices that must be followed for whatever code you’re writing, and if you don’t follow them, that’s a vulnerability in itself.
For example, let’s think about a container image. One of the biggest best practices when it comes to container images is to not use the latest or head tag inside of a Kubernetes manifest. The reason why is because when you’re building out a production environment, you typically want to have a specific container image version that you’re using because latest or head could be a Dev or QA container image. Then, if you use the latest tag in your Kubernetes Manifest and that Manifest gets re-deployed, you could be faced with a major production issue.
The other major reality is you simply don’t know what you’re getting out of the box when it comes to templates and code. For example, in an upcoming section, I show the output of scanning a Helm Chart that was created as a template by running helm chart create. That means even the Helm Chart templates that are out of the box have vulnerabilities, which could be a major concern for organizations that are going off of the templates as a starting point.
In short, the reason why you want to use repository scanning is to ensure that you’re following best practices and that your code doesn’t have security vulnerabilities or misconfigurations.
Current State Of Repo Scanning
Repository scanning has become incredibly popular.
Think about it - one of the biggest products that GitHub released recently, and spent a ton of their time on, is GitHub CodeScanning.
Although scanning code in a repository is incredibly popular amongst many developers, when it comes to DevOps engineers and Platform Engineers, the reality is that a lot of folks still don't do repository scanning or code scanning for configuration languages.
There are two primary reasons:
- The engineers don’t have a dev background, so they aren’t used to the idea of scanning code.
- They simply don’t think it’s important.
However, as we learned in the previous section, even running a 20 line Python script is important because you never know when you’ll have a vulnerability. Another key example is If you use a public repo, for example, you don’t know what’s in the code and you can’t be sure if someone is trying to manipulate you to create a backdoor into your environment. You also never know when a library that you’re using will be deprecated or have a security vulnerability in itself.
As of right now, the current state of scanning code inside of a repository isn’t at an all-time high for engineers that are on DevOps or Platform teams, but it absolutely should be used, for any configuration language used.
Getting Started With Kubescape Code Repository Scan
Now that you know why scanning your code is important, let’s jump into the hands-on goodness and learn how to scan entire repos with Kubescape.
Please Note: The below scan is done against a Helm Chart, but it works the same exact way when you scan any Kubernetes Manifest, so you can use this same method if you don’t use Helm.
First, you’ll need a Helm Chart or a Kubernetes Manifest to scan. If you don’t already have one, you can fork the code from the repository below.
github.com/AdminTurnedDevOps/PearsonCourses..
Once you have the Helm Chart or Kubernetes Manifest inside of a repository, you can use the kubescape scan command to scan the entire repository, or even get as granular as possible and only scan one directory where a specific Helm Chart or Kubernetes Manifest exists.
Below is an example of a kubescape scan against a specific Helm Chart in the nginxupdate directory inside of a GitHub repo.
Ensure that when you run the kubescape scan command you use the --account flag with your Kubescape account ID. That way, the results show up in the Kubescape UI.
kubescape scan github.com/AdminTurnedDevOps/PearsonCourses.. --submit --account your_kubescape_account_id
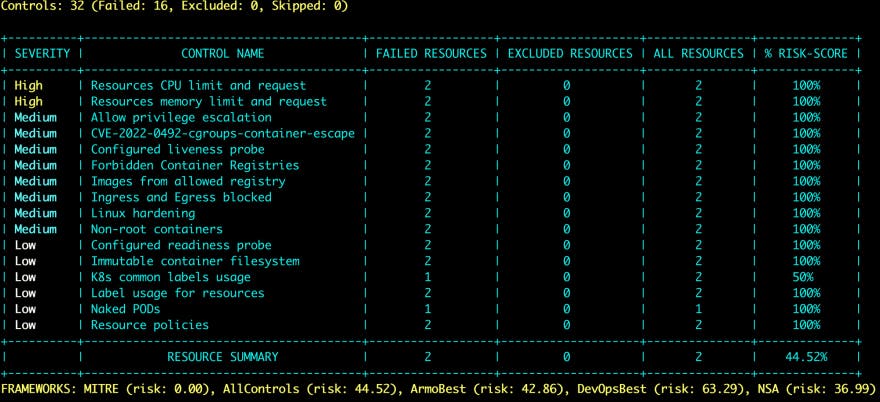
Once you run the kubescape scan command, you’ll see an output similar to the screenshot below that shows:
- Severity score
- Name of the severity
- How many resources failed the test for the resource
- Excluded resources
- All resources scan
- The risk score by percentage

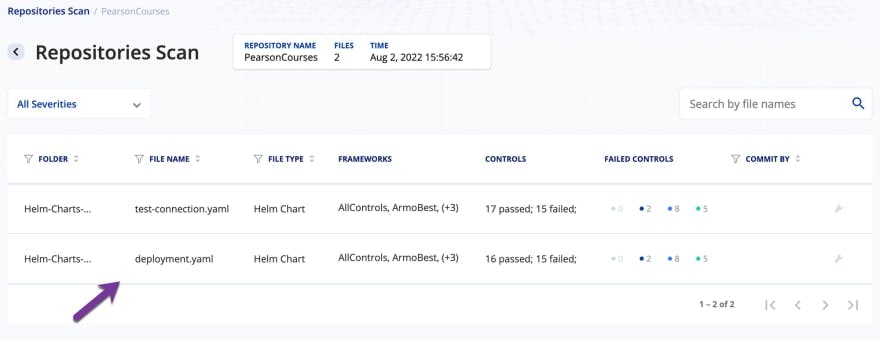
Once you’ve viewed the results on the terminal, log into your Kubescape UI and in the left pane, click on REPOSITORIES SCAN.

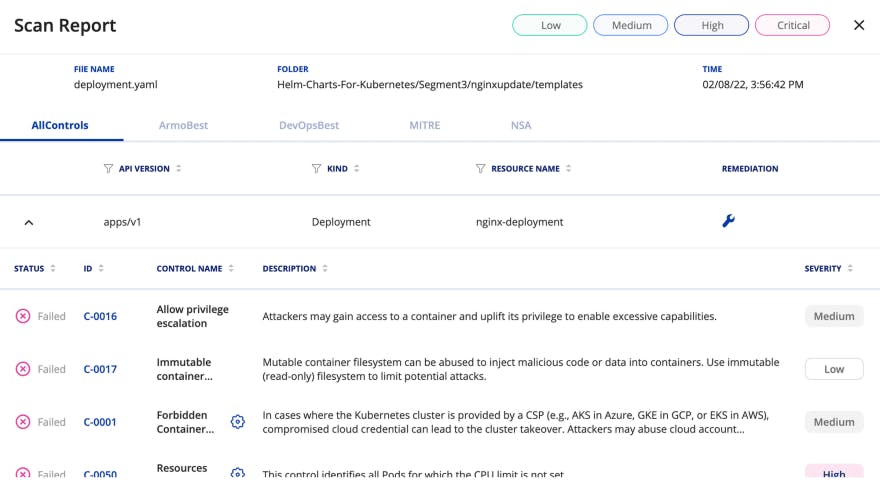
Once you click on the Manifest, you can see a list of vulnerabilities that have occurred and the IDs that are associated with the scan.

Well done! You have successfully scanned a Helm chart and in turn, a Kubernetes Manifest, using Kubescape.
