

Container History
Docker is a container runtime. A lot of people think that Docker was the first of its kind, but this is not true – Linux containers have existed since the 1970s.
Docker is important to both the development community and container community because it made using containers so easy that everyone started doing it.
What are containers?
Containers, or Linux Containers, are a technology that allows us to isolate certain kernel processes and trick them into thinking they're the only ones running in a completely new computer.
Different from Virtual Machines, a container can share the kernel of the operating system while only having their different binaries/libraries loaded with them.
In other words, you don't need to have whole different OS (called guest OS) installed inside your host OS. You can have several containers running within a single OS without having several different guest OS's installed.
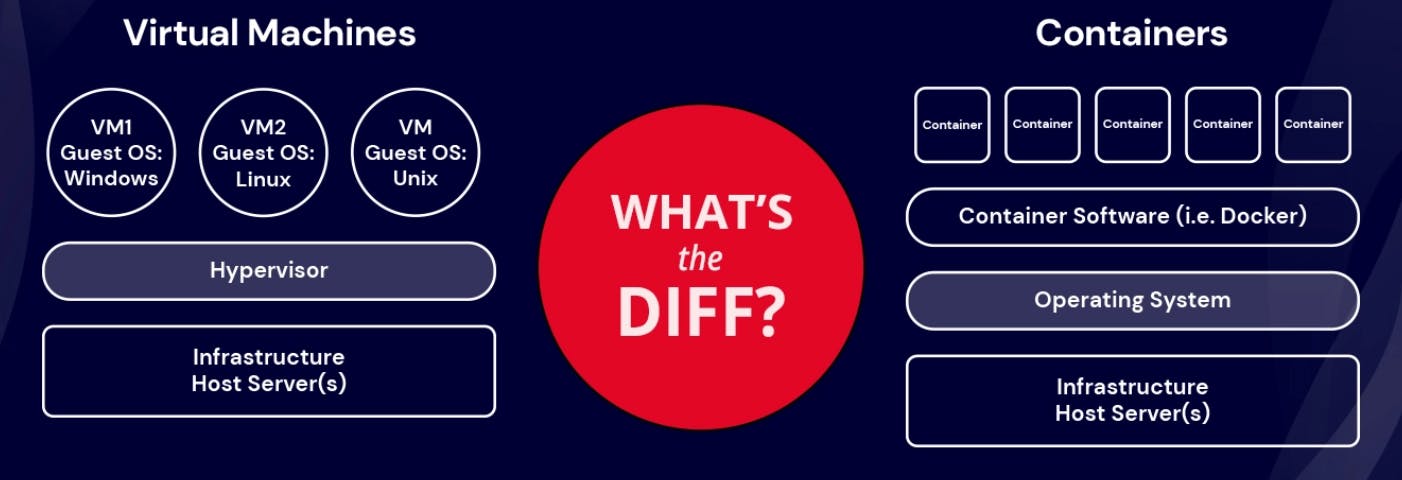
This makes containers much smaller, faster, and more efficient. While a VM can take about a minute to spin up and can weigh several Gigabytes, a container weighs, on average, 400 to 600mb (the biggest ones).
They also take only seconds to spin up. This is mostly because they don't have to spin a whole operating system before running the process.
And this all began with six characters.
Why use containers?
Containers offer a logical packaging mechanism in which applications can be abstracted from the environment in which they actually run. This decoupling allows container-based applications to be deployed easily and consistently, regardless of whether the target environment is a private data center, the public cloud, or even a developer’s personal laptop. This gives developers the ability to create predictable environments that are isolated from the rest of the applications and can be run anywhere.
From an operations standpoint, apart from portability containers also give more granular control over resources giving your infrastructure improved efficiency which can result in better utilization of your compute resources.
Due to these benefits, containers (& Docker) have seen widespread adoption. Companies like Google, Facebook, Netflix and Salesforce leverage containers to make large engineering teams more productive and to improve utilization of compute resources. In fact, Google credited containers for eliminating the need for an entire data center.
How Does Docker Work?
Docker packages an application and all its dependencies in a virtual container that can run on any Linux server. This is why we call them containers. Because they have all the necessary dependencies contained in a single piece of software.
Docker is composed of the following elements:
a Daemon, which is used to build, run, and manage the containers a high-level API which allows the user to communicate with the Daemon, and a CLI, the interface we use to make this all available.
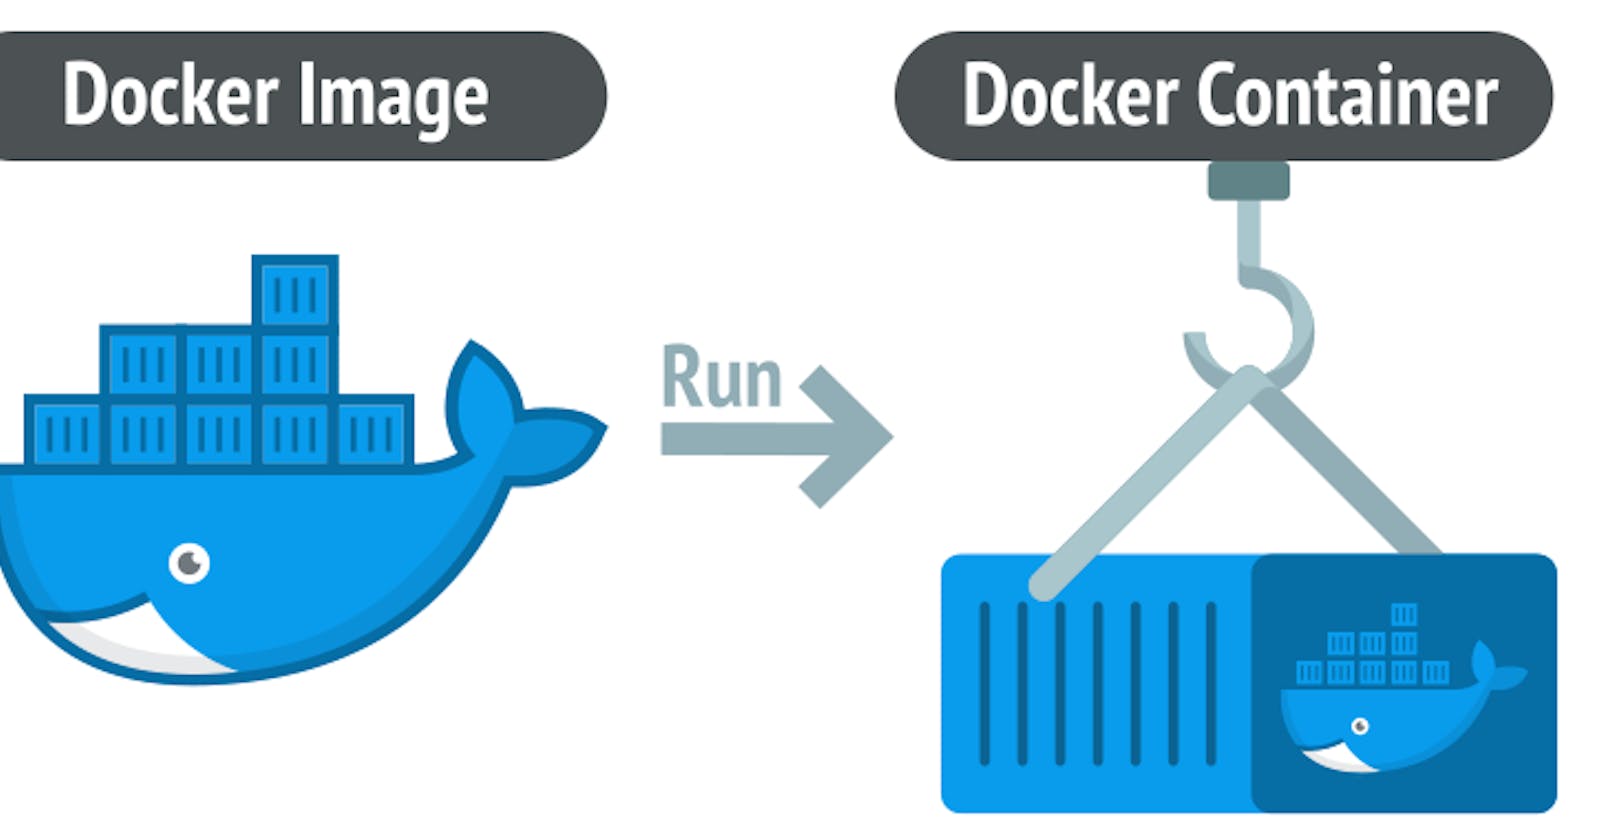
Docker Containers
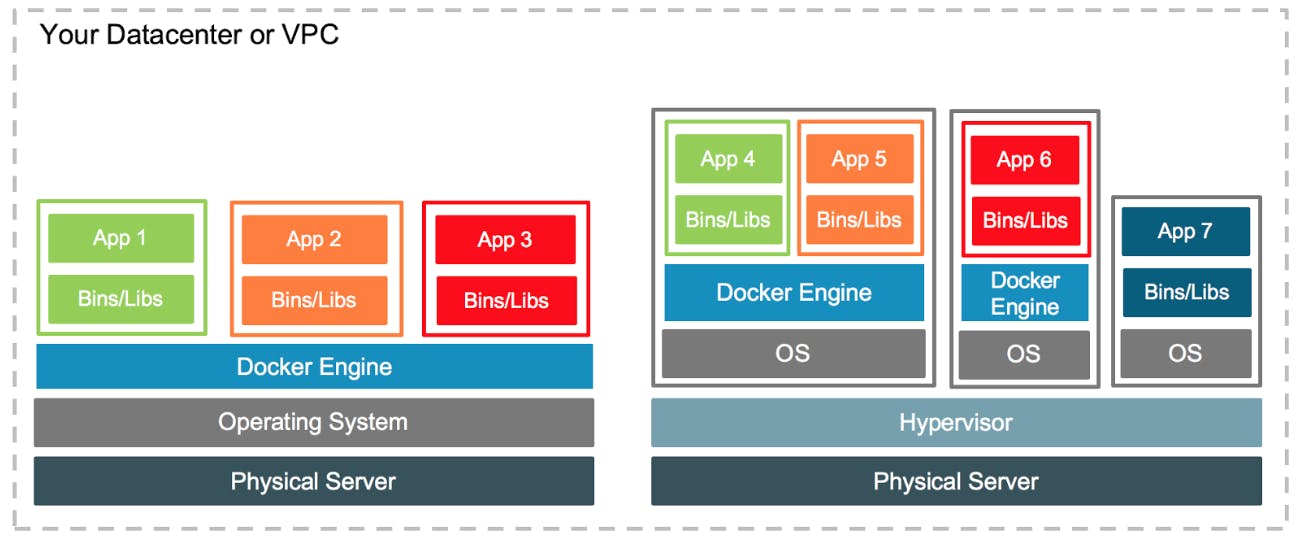
Containers are abstractions of the app layer. They package all the code, libraries, and dependencies together. This makes it possible for multiple containers to run in the same host, so you can use that host's resources more efficiently.
Each container runs as an isolated process in the user space and take up less space than regular VMs due to their layered architecture.
These layers are called intermediate images, and these images are created every time you run a new command in the Dockerfile, for instance, if you have a Dockerfile that's like this:
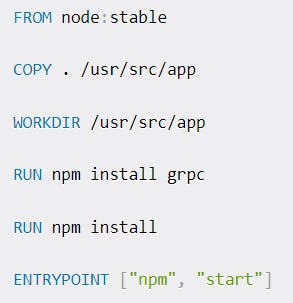
At each command like COPY or RUN you'll be creating another layer on top of your container image. This allows Docker to split and separate each command into a separate part. So if you eventually use this node:stable image again, it won't need to pull all the layers of it, because you have already installed this image.
Also, all layers are hashed, which means Docker can cache those layers and optimize build times for layers that didn't change across builds. You won't need to rebuild and re-copy all the files if the COPY step hasn't changed, which greatly reduces the amount of time spent in build processes.
In the end of the build process, Docker creates a new empty layer on top of all layers called thin writable layer. This layer is the one you access when using docker exec -it . This way you can perform interactive changes in the image and commit those using docker commit, just like you'd do with a Git tracked file.
This hash-diffed layer architecture is possible because of the AuFS file system. This is a layered FS that allows files and directories to be stacked as layers one upon another.
AuFS pose some problems when dealing with DnD (Docker in Docker), but this is a subject for other article! You can check out a deeper explanation in this article.
Why Docker containers are great
You have probably heard the iconic phrase "It works on my machine". Well, why don't we give that machine to the customer?
That's exactly the problem Docker and containers solve in general. A Docker container is a packaged collection of all the app's libraries and dependencies already prebuilt and ready to be executed.
A lot of companies have migrated over from VMs to containers not only because they're much lighter and faster to spin up, but also because they're extremely easy to maintain.
A single container can be versioned using its Dockerfile (we'll get to images in the next section), so it makes quite easy for one developer (or even a small team of developers) to run and maintain a whole ecosystem of containers. On the other hand, you would need an infrastructure person just to be able to run and housekeep VMs.
Does this mean that we don't needVMs anymore? No, on the contrary, VMs are still very much needed if you want to have a whole operating system for each customer or just need the whole environment as a sandbox. VMs are usually used as middle layers when you have a big server rack and several customers that'll be using it.
The ease of use and maintainability leads us to another important aspect of why containers are so great: it's way cheaper for a company to use containers than fully fledged VMs.
This is not because the infrastructure or hardware is cheaper, but because you need fewer people to housekeep containers, which means you can better organize your team to focus on the product instead of focusing on housekeeping.
Still related to savings, a single medium-sized VM can run about 3 to 8 containers. It depends on how many resources your containers use and how much of the underlying OS it needs to boot before running the whole application.
Some languages, like Go, allow you to build an image with only the compiled binary and nothing else. This means the Docker container will have much less to load and therefore will use fewer resources. This way you can spin up more containers per VM and use your hardware more efficiently.
Since containers are made to be ephemeral, this means all data inside them is lost when the container is deleted. This is great, because we can use containers for burstable tasks like CI.
The use of containers has brought a whole new level of DevOps advancements. Now you can simply spin up lots of containers, each one doing one small step of your deployment pipeline, and then just kill them without worrying if you've left something behind.
The stateless nature of containers makes them the perfect tool for fast workloads.
Now that we've seen how containers are awesome, let's understand how we can build one of them!
What are Docker Images?
Docker images are instructions written in a special file called a Dockerfile. It has its own syntax and defines what steps Docker will take to build your container.
Since containers are only layers upon layers of changes, each new command you create in a Docker image will create a new layer in the container.
The last layer is what we call a thin writable layer. An empty layer which can be changed by the user and committed using the docker commit command.
This is an example of a simple image for a Node.js application:

In this simple example, we're creating a new image. All images are based on an existing image, or a scratch image.
These images are downloaded from a Container Registry, a repository for storing images of containers. The most common of them is the Docker Hub, but you can also create a private one using cloud solutions like Azure Container Registry.
When you run docker build . on the same directory as the Dockerfile, Docker daemon will start building the image and packaging it so you can use it. Then you can run docker run to start a new container.
Notice that we expose certain ports in the Dockerfile. Docker allows us to separate networks within our own OS, which means you can map ports from your computer to the container and vice-versa. Also, you can execute commands inside containers with docker exec.
Let's put this knowledge into practice.
How to Deploy your Dockerized Application
This will be a simple and easy walkthrough on how to create a basic Docker image using a Node.js server and make it run on your computer.
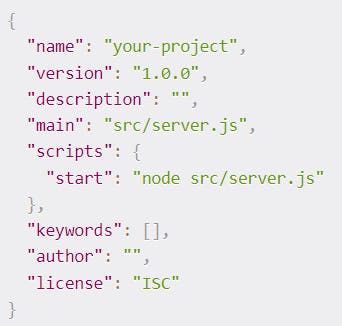
First, start a new project in a directory of your choosing, and run npm init -y to create a new package.json file. Now let's create another directory called src. In this directory we'll create a new file called server.js.
Now, in your package.json file, change the main key to src/server.js. Also, delete the test script that was created and replace it with "start": "node src/server.js". Your file should be like this:
Now, create a file called Dockerfile (no extension). Let's write our image!
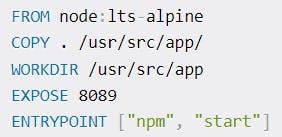
Let's explain this:
First, we're getting the node image from Docker Hub. Since images are saved by their names, we differentiate images by their tags. You can check all tags here.
Next, we use COPY to copy all files in the current dir (using .) to a new dir in the container called /usr/src/app. The directory is created automatically. This is necessary because we need all our application files in there.
Now we change our start directory to the /usr/src/app directory, so we can run things from the root directory of our application.
We expose our port,
And we say that, as soon as our container runs, we'll execute "npm start".
Let's build the image by running docker build . -t simple-node-image. This way we'll tag our image and give it a name.
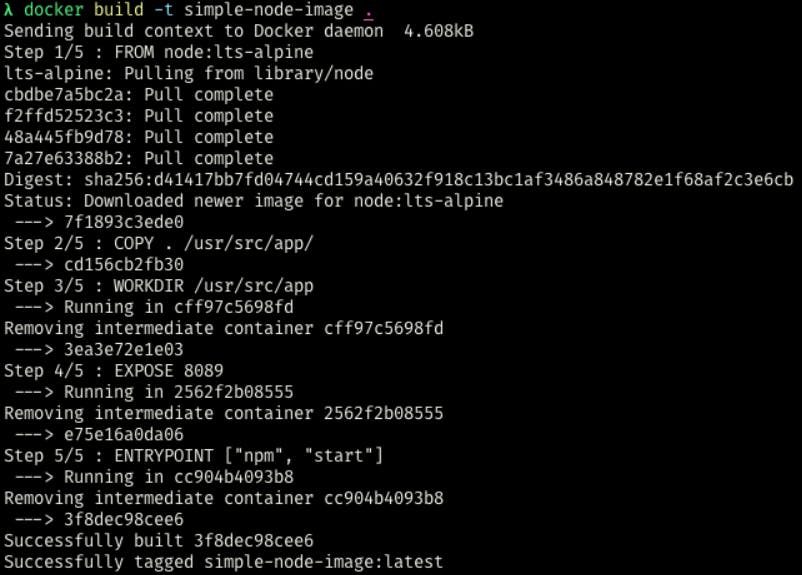
You'll see that it's going to create and download the image, along with all the necessary layers. Let's run this image with the following command:
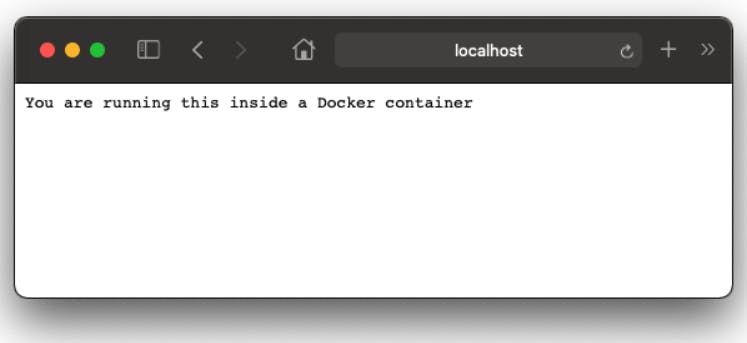
docker run -p 80:8089 simple-node-image
We're mapping our port 80 to the port 8089 inside the container. We can check that by typing docker ps like this:

Now try to access localhost:80, and see what happens:
What is Docker Used For?
Now that we've seen how to build a Docker container, let's jump into some practical uses of Docker and how you can get the most out of it.
Ephemeral databases
Have you ever tried to develop an application that requires a database to run? Or worse, tried to run someone else's application that needs a database that you don't have installed?
The old solution was to install the database first, then run the application. With Docker you just need to run the database container. Let's run a simple MongoDB container:
$ docker run -p 27017:27017 --name my-ephemeral-db mongo
That's it! Now you can access your database from your computer through port 27017, just like you'd do normally.
Persistent databases
The problem with the previous example is that, if you remove the container, all your data will be lost. So, what happens if you want to run a local database without needing to install it, but keep the data after it's deleted? You can bind Docker to a volume!
When you bind Docker to a local volume, you're essentially mounting your filesystem into the container or vice-versa. Let's see:
$ docker run -p 27017:27017 -v /home/my/path/to/db:/data/db --name my-persistent-db mongo
In this command we're mounting /data/db into /home/my/path/to/db. Now if we use docker stop my-persistent-db and docker rm my-persistent-db all our data will continue to be stored there.
Later, if we need the database again, we can mount it using the same command, and all the data will be back.
One-use tools
Another thing that all devs do: we install applications that we only use once. For example, that simple CLI to access that old database, or that simple GUI to some CI server.
Many tools already have Docker containers, and you can use them like this, so you don't have to install yet another tool in your notebook.
The best example is Redis. It has the redis-cli built in another container, so you don't need to install the redis-cli in your shell if you hardly use it.
Let's imagine you spin up a Redis instance with docker run -d --name redis redis --bind 127.0.0.1 bound to the localhost interface. You can access it through another container using:
$ docker run --rm -it --network container:redis redis-cli -h 127.0.0.1
The --rm flag tells Docker that it should remove the container as soon as it's stopped, while the -it flags tell it we want an interactive session (with a shell) and we'll need a TTY.
Run entire stacks
If you need to test an app that relies on another app, how would you do it? Docker makes it easy by providing docker-compose. It's another tool in your toolbox that allows you to code a docker-compose.yml file which describes your environment.
The file looks like this:
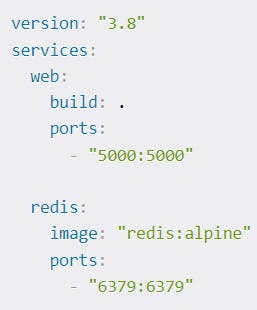
As you can see, we're defining two services, one is called web and runs docker build on the web.build path. That's a Dockerfile.
After that, it exposes port 5000 both in the host and in the container. The other service is redis, which pulls and runs the redis image on port 6379.
The best part is that the network layer is shared, in other words, you can access redis from the web service by simply typing redis and the port.
You can start this file with a simple docker-compose up, and see the magic happening.
Conclusion
That's it! This is the history of Docker, how it came to be, and how it works in 3000 words. I hope you liked it, and I hope this has made your advancement with Docker a bit easier.
As you could see, most uses of Docker are to make life easier for devs when developing applications. But there are many other uses, such as infrastructure layers and making the housekeeping of your apps a lot easier.